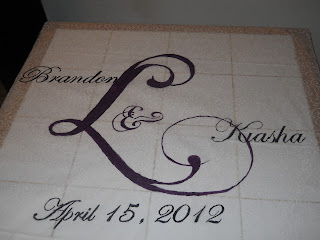
I got the aisle runner from michaels for about $20 bucks with a coupon and the acrylic paint bag of variety brushes with a coupon from michaels as well.
Step 1:
Design how you want it to look we did ours in photoshop and blew it up and taped it together
Step 2:
Tape the printouts of the logo to the surface your using and lay the aisle runner over it. We put the logo a feet away from the front of the aisle runner because we want it to be in our pictures. Than you want to go back to how easy life was in kindergarten and trace. We were able to trace ours kind of dark because were painting it dark colors but if your painting light colors you wanna trace lightly.
 |
| My Fiance Tracing away |
 |
| Our L traced out |
Step 3:
Once you got it all traced out you remove the tape and the print out from under it
Step 4.
You wanna start painting its way easier to work from the inside out. The paint will bleed through so you may want to lay wax paper under it or if you have tile table like ours its not a big deal cause it just wipes off. You wanna take your time because even though you can make little mistakes like going outside the lines (you can smooth it out) smudging paint somewhere could be a bit of a disaster.
Step 5:
Once your big initial is done you want to let it dry before you start working on your other lettering. I let ours try for about 4 hours.
 |
| Our names and date traced out |
Step 6:
Start on painting your names and date this part at least for us was the most difficult because we choose a really swoopy font. But it was so worth the effort because in the end it came out gorgeous
 |
| All done |
Step 7:
Give yourself a pat on the back


That turned out SO good!!
ReplyDeleteThanks Natalie I was so excited to see how it looked when we finished. This wedding has made me pretty crafty
ReplyDelete